You like the photo, but the face is too dark, a stray object pulls your eye, or the background feels busy. A useful ChatGPT photo editing prompt starts with that specific problem. Attach your photo, ask for one clear change, and name the details you want preserved.
Try this structure:
Edit the attached photo. Change [specific element] by [visible adjustment].
Keep [person, facial features, pose, clothing, objects, framing] unchanged.
Keep the result photographic. Do not [specific unwanted change].
Return the edited image.
Replace the brackets before sending. “Improve my photo” leaves the intended change open; “brighten the shaded face slightly while keeping the sky unchanged” gives you something to judge. A preservation instruction is a request, so compare the output with your original before keeping it.
Choose a prompt for your photo
Jump to a starting point, copy the prompt, and replace any details that do not match your image. Check the result against your original before saving.
- Brighten a shaded face
- Remove a distracting object
- Replace a portrait background
- Adjust a product photo
- Improve a landscape photo
- Preserve facial features
Start with the photo you want to edit
Open a ChatGPT web chat, attach your photo in the message composer, and send the editing instruction with it. OpenAI documents this reference-image editing route; image availability and usage limits depend on your plan and workspace settings. Check your account's available controls rather than assuming a particular model or subscription. Official OpenAI image guidance.
Keep a separate copy of the original. For a first attempt, attach one target photo so “the attached photo” is unambiguous. If you also attach a visual reference, identify its role: “Image 1 is the photo to edit; image 2 shows the background color only. Keep the person from image 1.”
Before sending, decide what success looks like: a brighter face, a clean tabletop, or a quieter background. Include the change and the preservation rules in the same request. If the reply only describes how to edit, clarify: “Please edit the attached photo and return an image, rather than instructions.” If image editing is unavailable in your session, check the account's access settings; different wording cannot supply missing access.
The prompts below are starting points for your own photos. The worked example later uses a generated fictional subject and an actual built-in image-tool edit; it is not a test of the ChatGPT website or PhotoEditorAI.
Three useful edits, with checks for each
Brighten a shaded face without washing out the scene
Use this when the face is visible but darker than the surrounding scene. If facial detail is missing in the source, do not treat newly rendered detail as a recovered record of what was there.
Edit the attached photo. Lift the shadows on the person's face slightly
so their expression is easier to see. Keep the sky and bright background
from getting brighter. Preserve facial proportions, expression, skin
texture, hair, clothing, pose, and crop. Keep natural contrast and the
existing light direction. Do not smooth skin or add makeup.
Return the edited image.
Check: Compare the cheeks, forehead, sky, and shirt. You want readable shadow detail without a pale face or a bright halo around the head. Compare skin tone with the original instead of judging brightness alone.
If it goes too far: Reattach the original and ask for a subtler adjustment: “The previous version brightened the face too much. Apply a smaller lift to the face shadows only. Keep the original skin tone and all facial features.” Retain the rest of the preservation instructions.
Remove one background distraction
Use this when you can identify the unwanted object clearly and it does not cover something you need to preserve. Name its color, position, and relationship to the subject rather than saying “clean up everything.”
Edit the attached photo. Remove only the red paper cup on the table
to the viewer's right of the person. Fill that small area with table
surface consistent with the surrounding wood grain and lighting.
Preserve the person's face, expression, hair, hands, clothing, pose,
the white ceramic mug, the background, and the original crop.
Do not beautify the person or change the overall lighting.
Return the edited image.
Swap “red paper cup” and its location for the object in your photo. If the object covers a hand or face, the replacement would require inventing the hidden area. Choose another photo or a controlled manual edit when that reconstruction would be unacceptable.
Check: Inspect the filled patch for repeating texture, broken edges, and mismatched shadows. Then look outside it: did the mug handle, fingers, or face change even though you asked to keep them?
If the wrong object disappears: Return to the original and make the location more specific. For example: “Remove the small red cup behind the white mug, not the mug the person is holding.”
Replace a busy background for a simple portrait
Use this when you want a new setting and can accept a generated background. Specify its appearance and keep the subject's boundary explicit.
Edit the attached portrait. Replace only the background with a plain,
soft gray wall with subtle texture. Keep the person's face, expression,
skin texture, hair, body proportions, clothing, and pose unchanged.
Keep the original crop and lighting on the person. Make the new
background consistent with that lighting. Do not add objects, change
the person's age, or reshape facial features. Return the edited image.
Check: Look at flyaway hair, ears, glasses, shoulders, and gaps between arms and body. A clean background is not enough if the subject has a cutout halo or softened features.
If the edge looks artificial: Ask for one correction: “Refine only the hair and shoulder edges against the gray background. Keep the person and the rest of the result unchanged.” If the person already changed, restart from the original instead of refining that altered version.
Adjust a product photo
Use this template to request a cleaner setting while keeping the product recognizable. Replace the bracketed details with the item and background you want.
Edit the attached photo of [product]. Replace only the background with
[background description]. Preserve the product's shape, color, label,
logo, texture, and all visible details. Keep the original camera angle.
Use lighting and shadows consistent with the product. Do not add text,
change the packaging, or invent product features. Return the edited image.
Check: Compare the label, lettering, color, and edges with the original. Reject the result if important product details have changed.
Improve a landscape photo
Use this for a restrained tonal adjustment when you want to keep the scene as photographed.
Edit the attached landscape photo. Slightly lift shadows in [area] while
preserving highlights in [area]. Keep the original composition, horizon,
weather, colors, and visible objects. Do not add or remove elements, replace
the sky, or create new detail. Keep the result natural and photographic.
Return the edited image.
Check: Compare the sky, horizon, and shadow areas with the original for halos, lost highlights, and changes to scene details.
A ChatGPT prompt for photo editing without changing the face
For a natural portrait, first name an adjustment that does not require redesigning the person. A small lighting request is easier to evaluate than “make me look professional,” which leaves room for a new expression, makeup, or different facial proportions.
Add this preservation block to the specific edit you want:
Preserve the person's identity and facial features from the attached
original: eye shape and spacing, nose, lips, jawline, expression,
hairline, and visible distinguishing marks. Keep their age, body
proportions, and natural skin texture. Do not reshape the face,
smooth away distinguishing features, add makeup, or change the smile.
Treat that block as a comparison checklist, not a face lock. Look at the original and result side by side at the same size. Check the eyes and smile first, then the jawline, hairline, and distinguishing marks. A flattering output can still be the wrong likeness.
If you spot drift, reattach the original and narrow the task: “Use this original as the edit target. Change only the background; leave the face and body as they appear here.” Repeat your preservation block. Stop if the next result still changes details that matter to you. For a portrait requiring exact facial fidelity, use an editor that lets you isolate the background or lighting adjustment and inspect the untouched face.
Worked example: remove the cup, inspect the rest
For this demonstration, we generated a fictional adult at a cafe, then supplied that saved source image to the built-in image tool with the exact red-cup removal prompt above. The two images came from separate generation and editing calls. This demonstrates the prompt-and-inspect method on a synthetic source, not performance on a real customer's photograph.
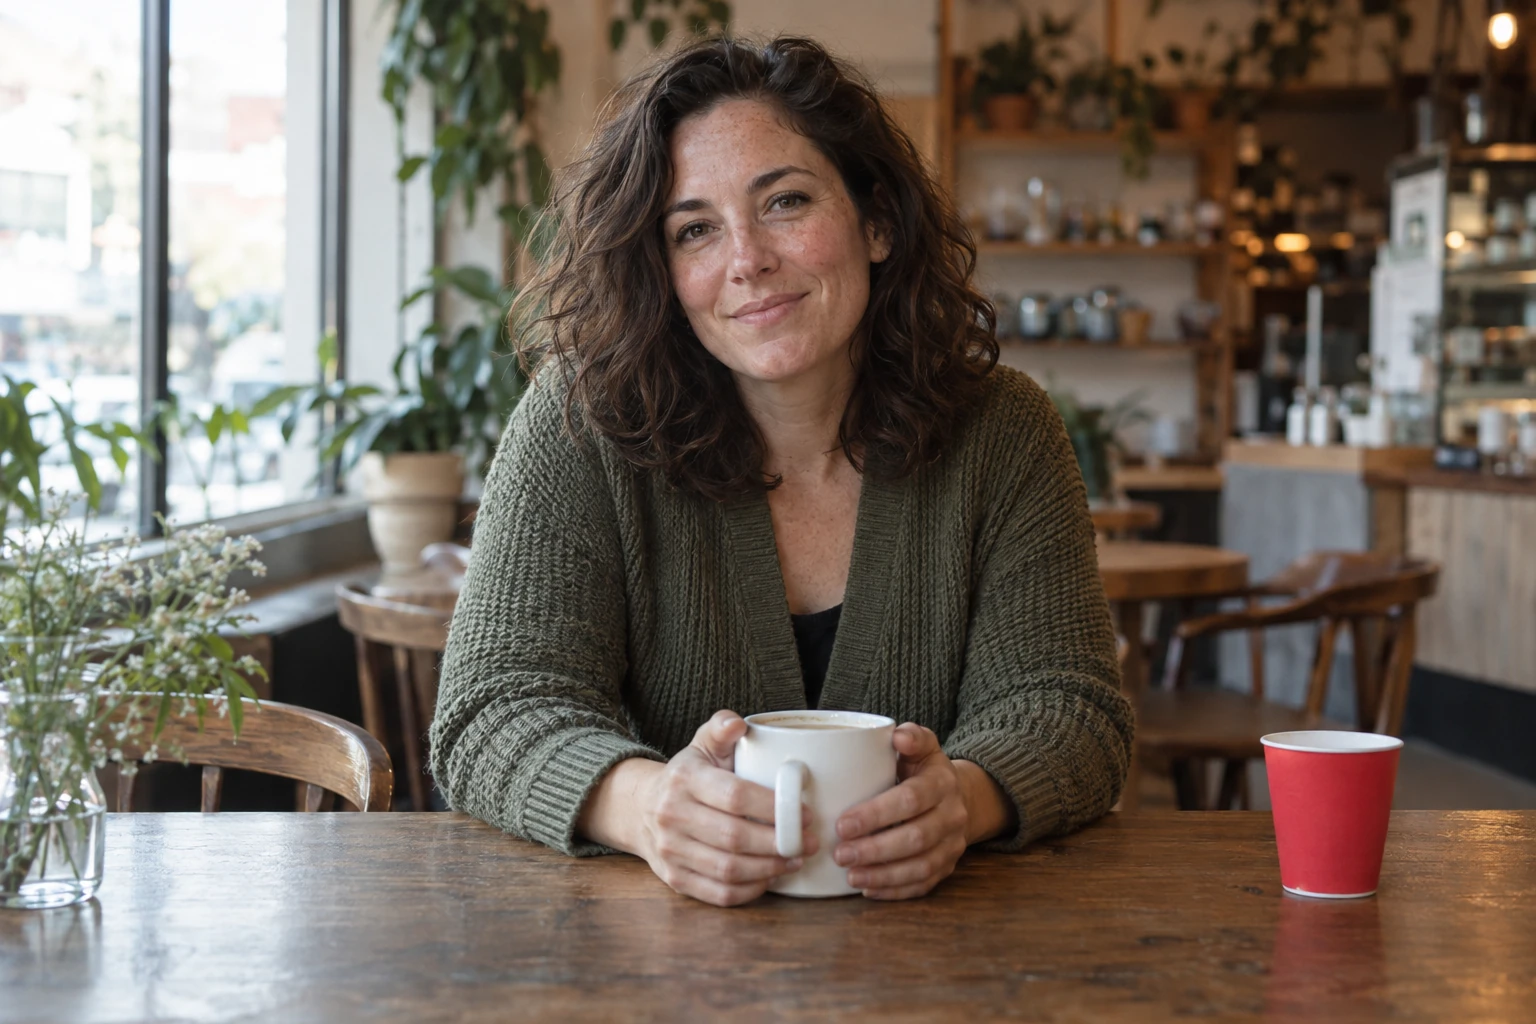
Source: generated fictional portrait. The red cup is the intended removal target.
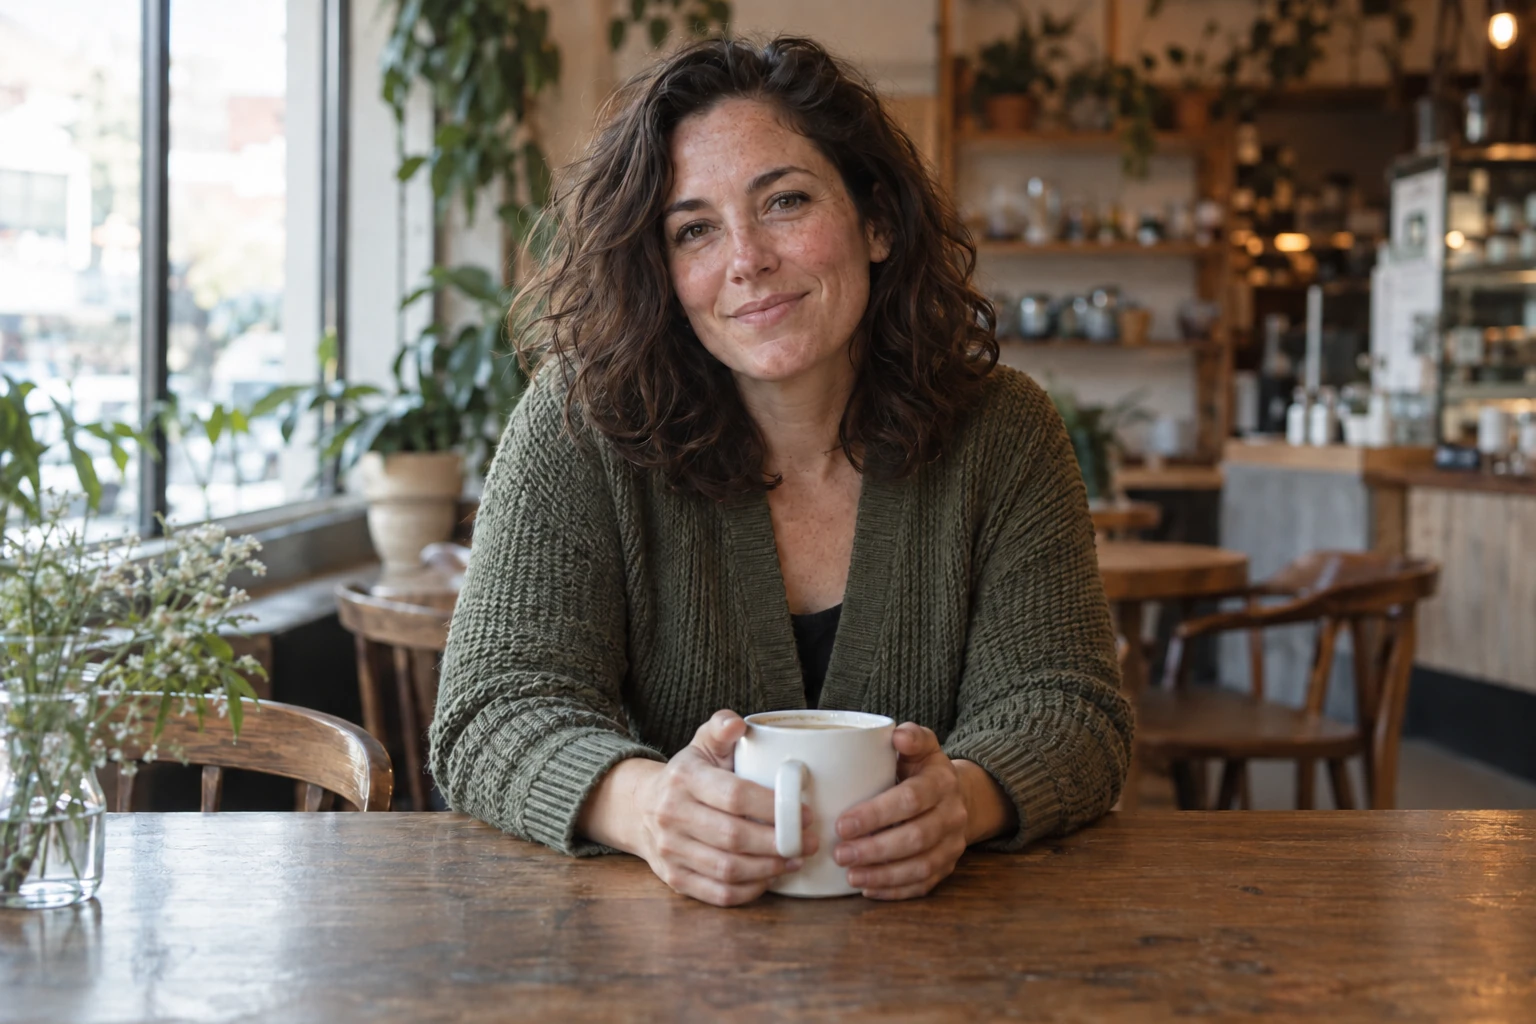
Result: the actual edit of the source image using the cup-removal prompt. Compare the table patch and the preserved subject at full size.
The visual inspection notes below describe this output only. They are not a guarantee that the same prompt will preserve every detail in another photo.
The red cup is gone, and the replacement patch reads as a continuation of the tabletop. The white mug, pose, and broad facial appearance remain recognizable. However, the knit pattern on the cardigan and some blurred background details differ. That is why “preserve everything else” needs a visual check: this output accomplishes the cleanup, but it is not an exact copy outside the removed object. If those other details mattered, we would reject this version and use a more controlled local edit.
Keep a good result, or make one focused retry
Use two views before saving: the whole photo for composition and light, then a close view of the changed area and any face or hands. Check the file at the size you intend to use; a defect hidden in a small preview can matter in a larger print or crop.
| What you see | Next action |
|---|---|
| Intended change worked; important details still match | Save a separate result and keep the original. |
| Intended change is too strong; subject still matches | Ask for one smaller adjustment on the result and repeat preservation rules. |
| Face, hands, lettering, or clothing changed | Restart from the original with a narrower edit. |
| Wrong object changed | Identify the target by location and appearance, then retry from the original. |
| Missing detail was replaced with a guess | Use a better source or a manual workflow when authenticity matters. |
Avoid combining “change the background, brighten the face, smooth skin, sharpen everything, and make it cinematic” in your first attempt. A single edit lets you see which instruction helped and where a new defect appeared. OpenAI also recommends small, targeted revisions with clear change-and-preserve instructions. Official image prompting guidance.
If you are starting a new image from a scene description, our guide to writing AI image prompts covers subject, composition, medium, and lighting. For another place to apply a written edit request, the PhotoEditorAI homepage has a photo upload and instruction field. It is a separate service; the demonstration here does not establish its results or ChatGPT feature compatibility.
FAQ
What are the best ChatGPT prompts for image editing?
Choose a prompt that fits the visible problem in your source photo. State one change, identify what must stay the same, and define how you will check the output. The lighting, cleanup, and portrait prompts above are practical starting points, not a ranked benchmark.
Can I reuse these AI photo editing prompts in another tool?
You can adapt the plain-language change and preservation instructions. Check that the tool accepts an existing image and supports the edit you want. Do not assume another tool will interpret the prompt or preserve details in the same way.
Should I upload the original again for every revision?
Continue from a result you already accept when only one small adjustment remains. Reattach the original when the result changed the person, the wrong object, or other important details. Name which image is the edit target so a later request does not build on a version you rejected.