To remove someone from a photo, work on a copy, identify exactly which person should disappear, and fill their space with a background that fits the scene. Then compare the main subject with the original. A missing photobomber is only half the job: your friend's face, hands, clothing, and outline should still look like your friend.
Start with a separated background person if you can. Someone standing on open paving is a better first attempt than someone covering your subject's shoulder. If the unwanted person sits near the edge, try a crop before asking an editor to rebuild anything.
Below are two routes: a browser prompt for a clearly described change, and Photoshop's desktop Remove tool for choosing the area yourself. The product steps were checked against Photo Editor AI's current homepage and source interface, and Adobe's documentation; they were not tested by submitting edits to either product. The illustrated edit later in this guide uses a separate built-in image model.
Look at what the person is hiding
Imagine a vacation portrait with your friend on the left and a stranger on the right. If there is visible stone paving around the stranger, you can judge whether the replacement continues that texture. If the stranger covers a shop sign, the missing lettering is a different problem: a plausible replacement could still be wrong.
| What you see | A useful starting point | What to inspect afterward |
|---|---|---|
| Person separated from the subject, against open ground or a plain wall | Try a targeted removal | Texture, lighting, and any leftover feet or shadow |
| Person in front of tiles, railings, bricks, or signs | Use an area-based editor and make a small first attempt | Lines, spacing, lettering, and perspective |
| Person overlapping the subject's body or hair | Look for another frame or a workable crop first | Whether the edit invents part of your subject |
| Person at the outer edge | Preview a crop | Whether the remaining composition still works |
Removal does not reveal an untouched scene hidden inside the file. Generative filling supplies a proposed replacement. Treat newly filled detail as a reconstruction, especially when the original does not show the surface—or the part of a person—that was behind the obstruction.
Keep a copy of the largest original you have. Before starting, decide what must stay: for example, “the woman in the blue jacket, her bag, the sea wall, and the original crop.” This makes it easier to reject an attractive result that changes the wrong thing.
Route 1: Describe the removal in Photo Editor AI
The Photo Editor AI homepage has a prompt editor. Use that entry for this route rather than the portrait or background-style presets.
- Choose Upload a photo and select one JPG, PNG, or WebP, up to 10 MB.
- In Describe your edit, identify the unwanted person by position and appearance. Name the person and details to preserve.
- Under Choose your model, review the displayed credit requirement. Choose Auto for image shape if you want to start without requesting a different ratio.
- Select Generate edit using the available allowance or account credits.
- When a result appears, use Compare, then Download only if it meets your needs. Inspect the downloaded file too.
For the hypothetical vacation portrait, try:
Remove only the man in the red shirt on the far right, including his separate shadow on the paving. Fill that area with paving consistent with the nearby stones. Keep the woman in the blue jacket, her face, hands, bag, the sea wall, lighting, and framing unchanged.
That last sentence is a request, not a guarantee that those details will survive. Compare them explicitly. If the wrong person disappears, return to the original and make the identification clearer—“the smaller background figure beside the right-hand wall”—rather than asking the editor to repair several accumulated mistakes.
Read the site's Privacy Policy before sending a personal image. It says uploads are stored and sent to processing providers; do not assume a browser editor keeps the file solely on your device.
Route 2: Choose the removal area in Photoshop on desktop
Use this route when you already have Photoshop and want to mark the region yourself. These controls belong to Photoshop; the browser route above uses a text description.
Adobe's Remove tool instructions, updated August 18, 2026, describe the following workflow:
- Open the photo with File > Open. Select the Remove tool in the Tools panel.
- Use Create new layer in the Remove tool's Contextual Task Bar to keep the removals on a separate layer.
- Set the brush slightly larger than the area to remove. Draw a loop around the unwanted person, keeping the subject you want outside that area.
- Review Remove after each stroke, which applies removal after each brush stroke. Start with one person so you can inspect the result before doing another.
- Check Mode: Auto may use generative AI; the other choices turn it on or off. Choose deliberately rather than assuming every removal works the same way.
After the fill, compare with the original and save an edited copy. If the filled area bends a railing or smears a tile edge, undo that removal and change the area you marked. Avoid enlarging it into your subject merely to hide a seam. A difficult edge may need manual retouching or another source frame rather than another broad fill.
A synthetic example: remove one passerby, then inspect the rest
The images below are a synthetic example: a fictional travel scene generated for this guide, followed by an actual built-in image-model edit of that source. They are not a Photo Editor AI or Photoshop product test.
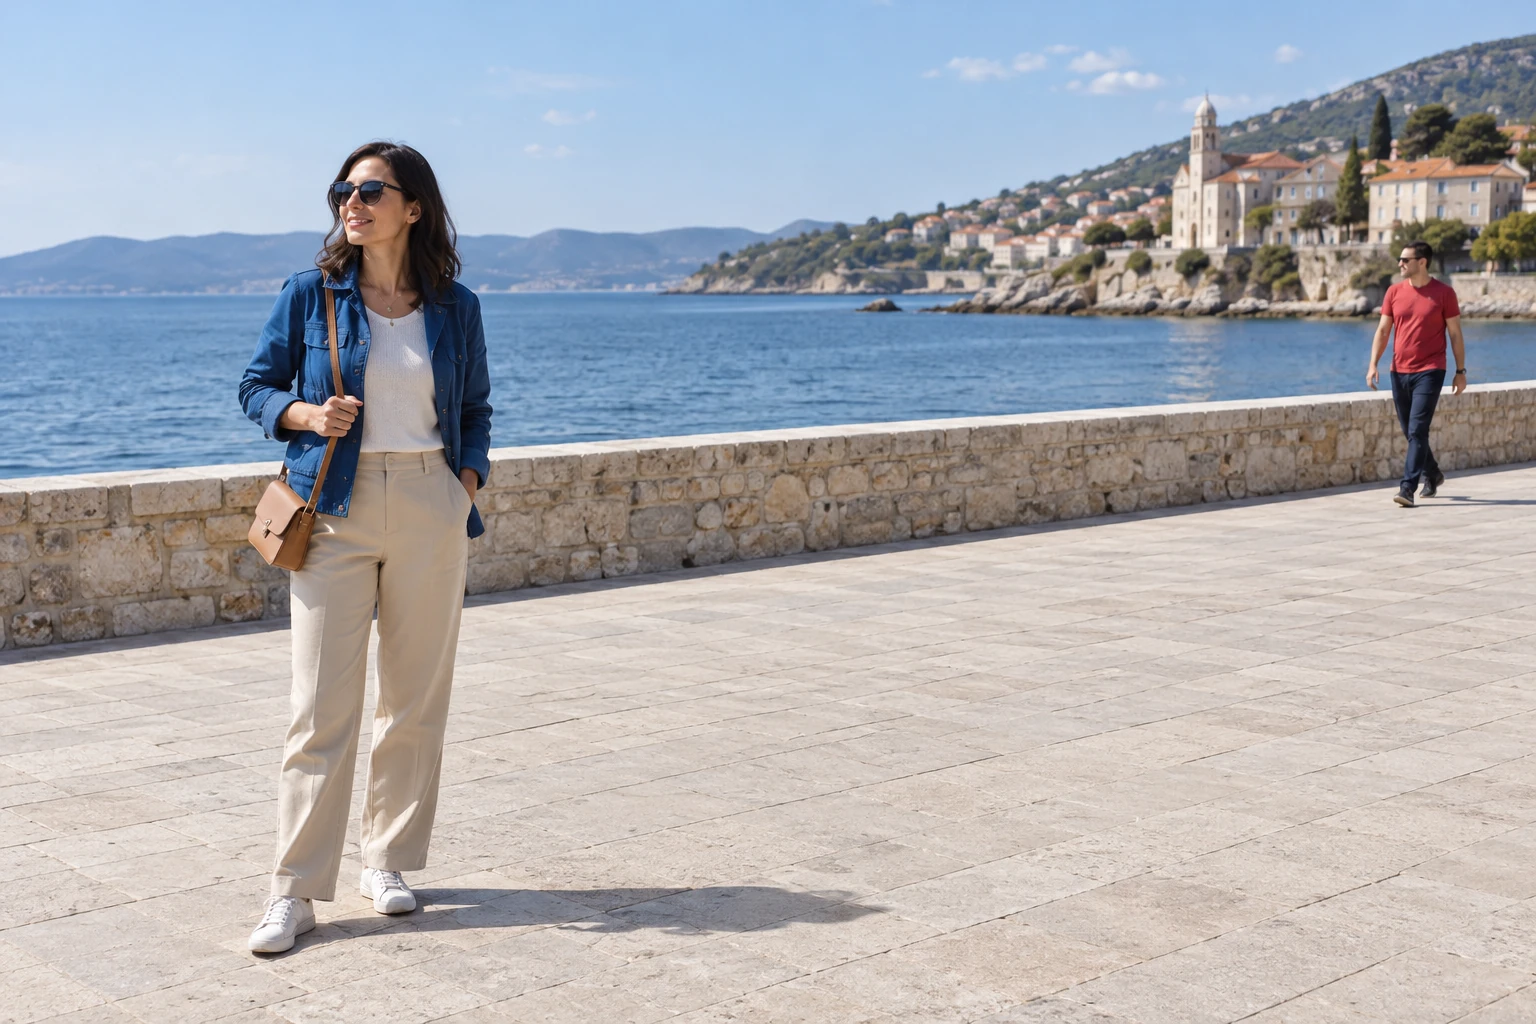
Source: the background passerby is separated from the foreground traveler, so the removal can target open paving without rebuilding the traveler's body.
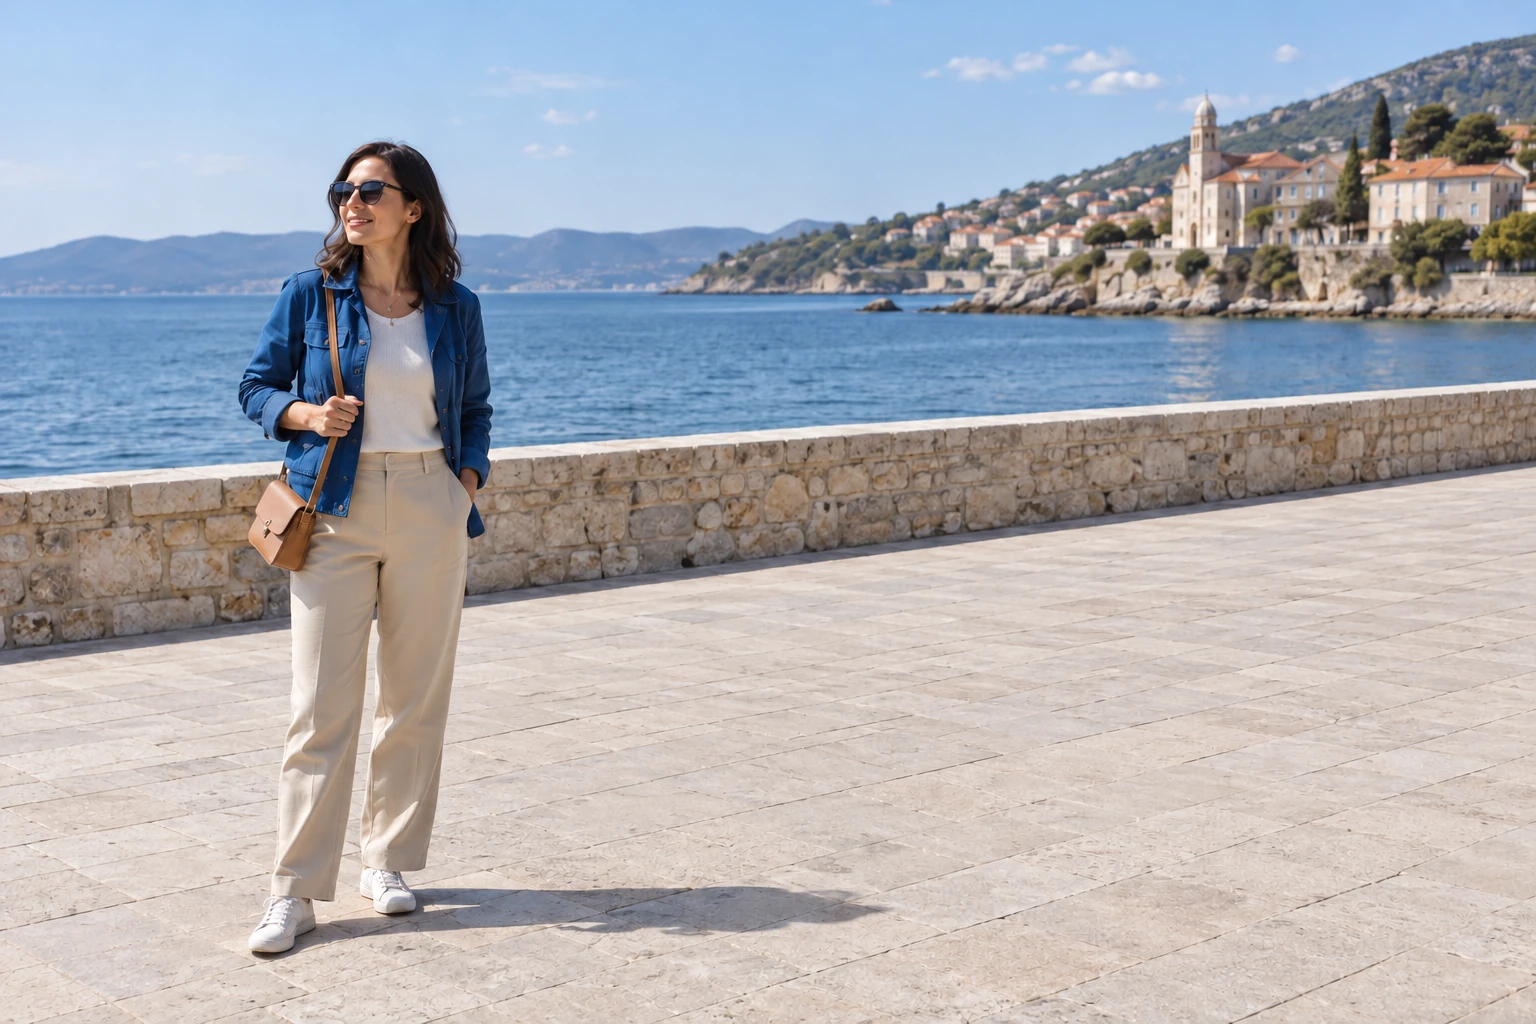
Edited result: the red-shirted passerby and his visible shadow are gone; the woman, her bag, and the overall framing remain recognizable. However, the paving texture and some joints also changed beyond where he stood. This is a reason to compare the whole photo, even when the requested removal appears complete.
When the person disappears but the photo still looks wrong
A leftover shadow can make an empty patch look occupied. Decide whose shadow it is before removing it: the stranger's dark patch may cross your subject's shadow. Ask for the stranger's separate shadow, or mark that area separately in an editor, while preserving the subject's grounding shadow.
A reflection is a second visible appearance of the person. Look at windows, mirrors, and water as well as the place where they stood. Removing their body does not itself settle what should happen to their reflection. In a complex reflection, a tighter crop may be more convincing than trying to rebuild the glass.
For repeating backgrounds, follow one line across the repaired area. A railing should not suddenly droop, and paving joints should not change direction around an invisible outline. At full size, look for a soft patch or repeated texture; at the size you will share, ask whether the repair draws your eye.
Most importantly, compare the subject. If their hairline, fingertips, face, or clothing edge changed, restart from the untouched original. A follow-up edit can be useful for a small background defect, but it is a poor reason to accept a changed likeness.
If another attempt produces the same kind of damage, change the approach. Crop out an edge distraction, use another photo from the same moment, or keep the original. If you are still at the location, wait for the passerby to move and take another frame. When someone covers an important part of the subject, a new photograph gives you information that a generated fill cannot verify.
Questions before you save
Can I remove someone from a photo on my phone?
You can try the browser prompt route on your phone: open the Photo Editor AI homepage, upload the image, describe the person, and inspect the result before downloading. Check the output enlarged, not only in the small preview. The Photoshop steps above are for desktop.
Can I remove a person who is touching or covering the main subject?
You can request it, but the filled area may invent the hidden part of the subject. Look for a crop or another frame first. If the edit changes the subject's appearance, keep the original rather than treating that reconstruction as recovered detail.
Is removing a person the same as removing a background?
No. For this task, keep the scene and remove one identified person. Requesting a new background is a broader change and can replace details you wanted to retain. The same targeted approach can help you remove objects from photos: specify the object, the surrounding surface, and what must stay.
Save the result as a separate file and keep the original. The useful result is a photo you still recognize, with a repair that holds up at its intended viewing size.