To remove glare from glasses in a photo, work on a copy, target the reflection rather than the whole face, and compare the eyes before saving. If the eyes are still visible, try a small local brightness or color correction. For a small bright spot, use a clone tool. When glare hides an eye, an AI editor can produce a candidate—but a believable replacement is not proof of the original eye detail.
You do not need to erase every reflection. The useful goal is to make the eyes easier to see while keeping the person, glasses, and lighting believable.
Choose a method for the reflection you have
Open the original at full size and look through each lens. Can you still trace the iris, eyelid, and lashes? Then choose your starting point:
| What you see | Start here | Watch for |
|---|---|---|
| A pale veil, but the eye is still readable | A local highlight or exposure adjustment | A dark patch replacing the bright patch |
| Green or blue glare over visible detail | A local color adjustment, then a small brightness correction | Gray skin or an unnaturally colorless eye |
| A small white spot away from the iris or eyelid | Clone nearby matching pixels | Repeated texture or a bent frame edge |
| A large reflection covering the iris or lashes | A tightly worded AI edit, or another original frame | Invented eye shape, gaze, or lashes |
| Both eyes are hidden and accuracy matters | Another photo or a reshoot | A plausible face being mistaken for an accurate repair |
These are starting choices, not promises that a particular file can be repaired. Try the least extensive change first. Keep an untouched original, and use the highest-quality file you have rather than a screenshot of the photo.
Remove glasses glare with a prompt-based AI editor
This route is useful when you want to try an edit without painting individual pixels. It also needs careful review: asking an AI model to preserve a face does not guarantee that it will.
1. Upload the original and keep the framing
On the Photo Editor AI homepage, the editor lets you upload a photo, describe an edit, choose a model, and choose an image shape. The page currently accepts JPG, PNG, and WebP files up to 10 MB. The following walkthrough is based on the public interface and source code, not a paid generation test on the site.
Save your original separately before uploading. If it exceeds the upload limit, make a copy that fits; do not replace your only full-resolution file. Read the site's current privacy terms before uploading someone else's portrait.
Choose Auto for image shape as a starting point to avoid requesting a different crop. Check the returned framing anyway. Select an available model and read the displayed credit requirement before you generate; no particular model is guaranteed to preserve the eyes better for your photo.
2. Describe one change and what must stay
In Describe your edit, begin with a narrow instruction:
Reduce the distracting glare and reflections on the eyeglass lenses only. Keep the glasses on. Preserve the person's identity, visible eye color, eye shape, gaze, eyelids, eyebrows, expression, skin texture, and the exact frame shape. Keep the original crop, background, and lighting. Do not beautify the face or change anything outside the lenses. Retain a subtle natural lens reflection.
For one troublesome lens, add a location that cannot be confused with the subject's perspective: “Focus on the lens on the left side of the image; leave the other lens unchanged.” If the eyes are partly visible, ask the model to preserve that visible detail rather than requesting a new, “perfect” pair of eyes.
Avoid broad instructions such as “fix this portrait” or “make the face look professional.” They give the editor more room to change skin, expression, hair, and lighting while solving the glare.
3. Generate, compare, and download a candidate
Choose Generate edit and wait for the result. If the page asks for access or credits, follow the current options only if you want to proceed. Review the before/after comparison, then download a candidate for a closer look. A small browser preview can hide changes to an iris or frame edge.
If the glare improves but the face changes, return to the original and narrow the request. For example:
Reduce only the bright reflection in the lens on the right side of the image. Preserve all visible eye detail. Leave the face, other lens, frames, hair, and background unchanged. Do not add lashes, reshape the eye, or smooth the skin.
Do not keep applying new edits to a result that already changed the eyes. Starting again from the original gives you a clear reference. If repeated candidates cannot retain the visible features, switch to local manual editing or use another frame.
An illustrative source and edit
The two images below are an AI-created demonstration of the task. A fictional adult portrait was generated first; that actual image was then supplied to the built-in image model for a separate glare-reduction edit. These are not Photo Editor AI product results and were not made through the site's editor.
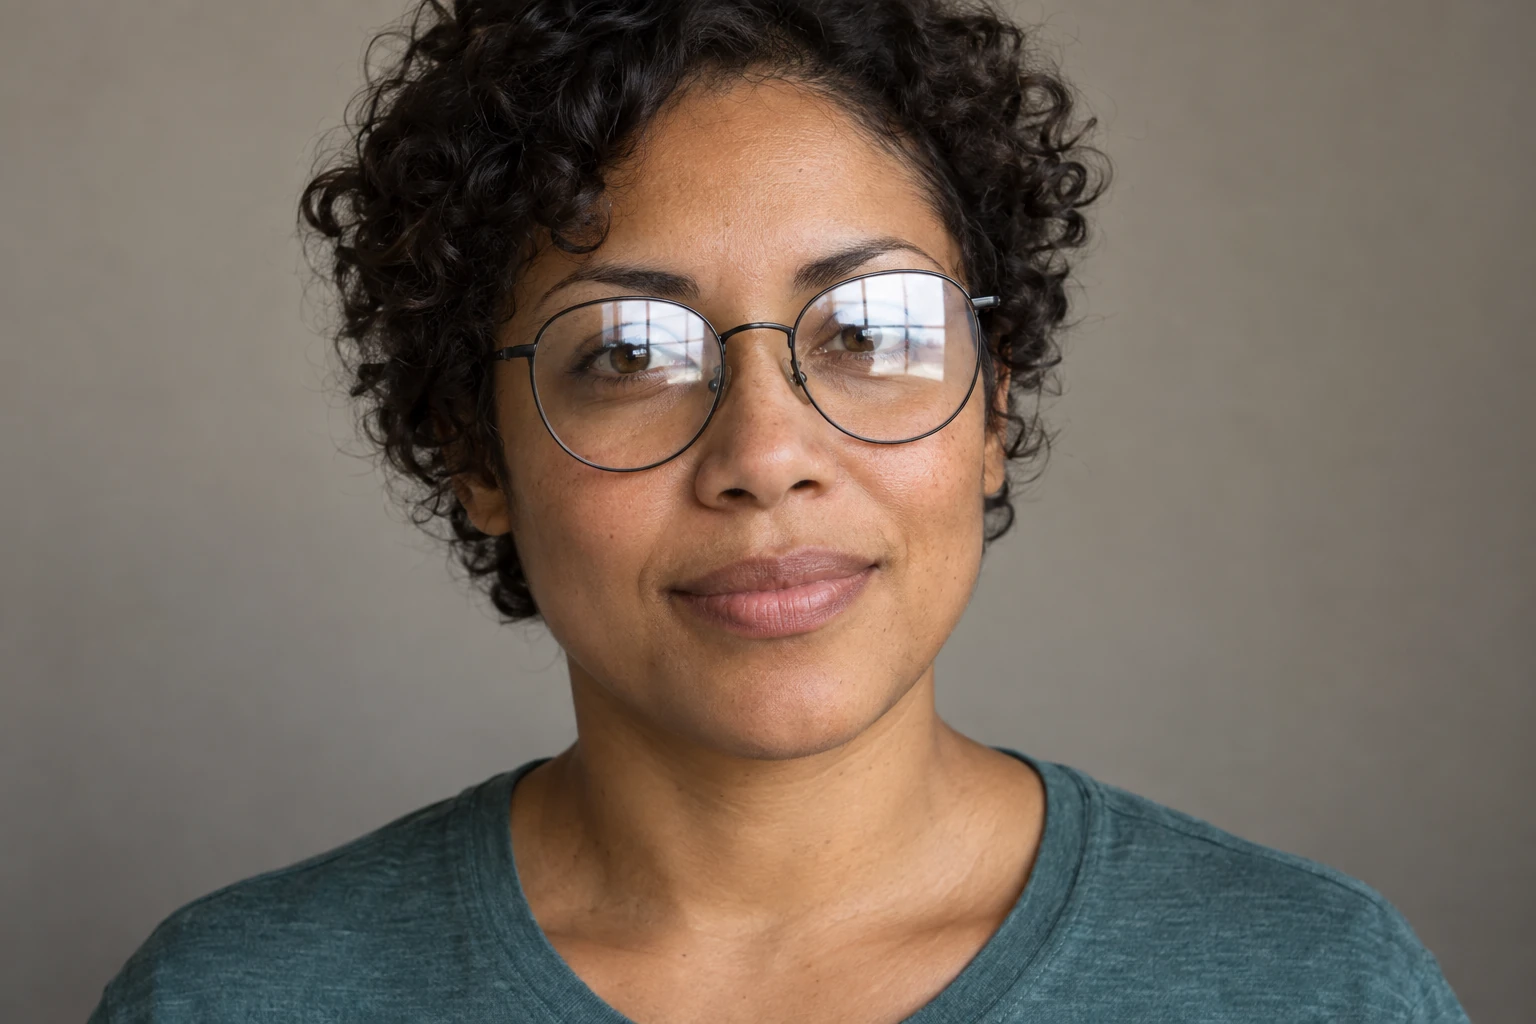
Source illustration: compare the reflection with the visible eye detail before choosing an edit.
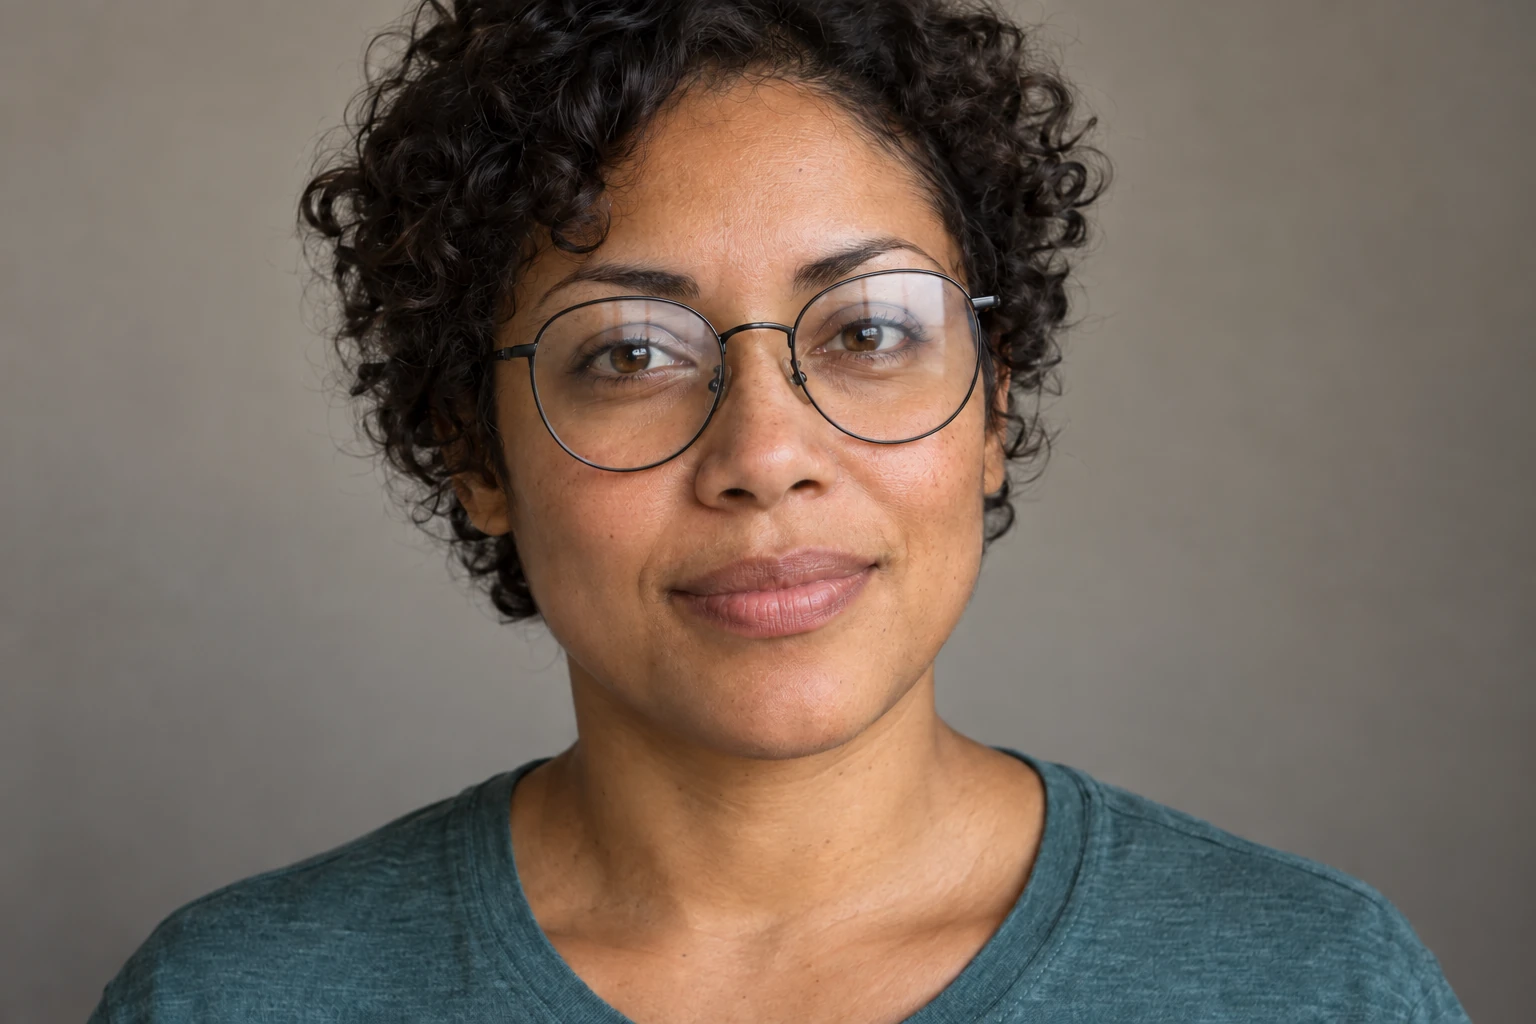
Edited illustration: the bright window reflections are reduced, but a faint window pattern remains, especially in the lens on the right side of the image. The eyes are easier to inspect; small changes in eye and skin detail still need review. This is a candidate, not proof of an unchanged face.
Reduce a thin reflection without replacing the eye
When you can still see the eye through the glare, a local adjustment lets you work with existing detail. A mask is a selection that limits an adjustment to part of the image.
In Lightroom Classic, open the photo in Develop, choose Masking, and use Brush over the affected part of one lens. Adobe documents the brush's feathering and local exposure, highlights, temperature, tint, and saturation controls in its masking guide.
Start by moving Highlights down a little. If the whole reflected area remains too bright, try a small reduction in Exposure. Keep checking the eye: stop if the iris or skin becomes darker than its surroundings. A reflection that turns into a flat gray patch has not become a convincing lens.
For colored glare, adjust Tint or Temperature cautiously within the same mask, or lower Saturation slightly. Do not desaturate the whole face to remove a green patch from one lens. Refine the brush boundary and soften the transition if you see an obvious rim around your correction. Work on the other lens separately when its reflection differs.
This can reduce a veil; it will not necessarily remove a sharply outlined window or recover an eye covered by a featureless white area. If brightness changes only make the patch darker without revealing usable detail, stop that route.
What about Lightroom's Reflections tool? Adobe's current reflection-removal instructions describe window reflections. That documentation does not establish success on eyeglasses. Treat glasses as a separate editing problem rather than assuming a window-reflection tool will reconstruct a portrait correctly.
Repair a small bright spot with Photoshop
Cloning copies existing pixels from a source area to a target area. It is a useful option for a small spot with a matching clean area nearby—such as a reflection over plain skin inside a lens. It becomes much harder when the spot crosses an iris, eyelid, or frame edge.
- Open the photo and create an empty pixel layer above it, named “Glare repair.” Keep the original layer underneath.
- Select Clone Stamp and set Sample to Current & Below. Use a brush smaller than the reflection. Begin with reduced opacity so you can build the change gradually.
- Alt-click on Windows or Option-click on macOS to sample a nearby clean area with similar tone and texture. Paint a short stroke over the spot, then inspect it.
- Resample as you move. Sample skin for skin and a frame edge for a frame edge; a single source point rarely matches every part of a lens.
- Toggle the repair layer off and on. Undo strokes that smear texture, double an edge, or make the lens look opaque. Save an editable version separately from the image you export.
The sampling and opacity controls are documented in Adobe's Clone Stamp instructions. The glare-specific use above is an editing approach to try, not a tested guarantee for every portrait.
Do not paste the other eye over a hidden eye as a quick fix. The two eyes may differ in angle, shape, and lighting. If you have a nearby frame from the same session with a clear eye and nearly identical pose, it may give an experienced retoucher a better reference, but alignment and expression still need to match.
Check the eyes before you accept the edit
Compare the downloaded file with the original at the same size and crop. Begin with a 100% view, then zoom out to the size at which you plan to share or print it.
Look at the pupils and iris outlines first. Did the gaze shift? Did one iris grow, or did the eye color change? Next, trace the upper and lower eyelids and the frame rims. Watch for extra lashes, a doubled bridge, a broken temple, or a frame that bends around a newly shaped eye.
Then move outside the lenses. Compare eyebrows, nose, skin texture, hairline, and background. A reflection edit should not require a different face. Our guide to AI headshot likeness explains why a polished portrait can still feel unlike its subject.
At normal viewing size, ask whether the lenses look like glass. A small natural reflection can be preferable to two empty-looking openings. If the glasses now look painted on, reduce the manual repair or reject the AI candidate. For broader portrait work, use the natural retouching guide to keep skin texture in view.
Save the accepted edit under a new filename. Keep the original and, for manual work, the layered file. Open the exported image once to check its dimensions, crop, and detail rather than judging only the editor preview.
When to use another photo or reshoot
If an eye is completely hidden by glare, you cannot verify its exact original appearance from that covered area alone. An AI-generated eye or a cloned replacement can be plausible while still being wrong. For a portrait where faithful likeness matters, another original frame is often the better starting point.
For a reshoot, take a test frame with the glasses on and inspect both lenses before continuing. Move the light higher or to the side, change the camera angle slightly, or ask for a small head turn. Make one change at a time and watch whether the reflected bright shape moves away from the eyes. Avoid a head tilt that solves glare but changes the portrait you wanted.
A screen, ring light, or window facing the glasses can create a recognizable reflection. Try moving the screen or light, or changing the subject's position relative to the window. Clean the lenses for smudges, but do not expect cleaning to remove the reflection of a light source.
Frequently asked questions
Can I remove glasses glare from a photo on my phone?
You can try the prompt-based route in a phone browser. Upload a supported file, ask for lens-only glare reduction, and inspect the download. Zoom in on both eyes and frame edges; use a larger display if you cannot judge those details confidently. Follow the current upload and access limits shown by the editor.
Can AI remove glare without changing my eyes?
It may preserve visible features, but the instruction is not a guarantee. Compare eye shape, color, gaze, eyelids, and lashes with the original. If glare completely hides a detail, the result cannot establish what that detail originally looked like.
Why does lowering highlights leave a gray patch?
Reducing brightness does not necessarily remove the reflected shape or supply missing eye detail. If the patch gets darker without becoming useful, undo the adjustment and try a small local repair, a carefully reviewed AI candidate, or a clearer original frame.
Should I remove every reflection from glasses?
Usually the more useful target is distracting glare over the eyes. Keep subtle reflections when they help the lenses look natural. Judge the final portrait at its intended viewing size, not only as a magnified close-up.